Showing posts with label Recipes. Show all posts

Thursday, July 25, 2013

Brie focaccia

Hello, hello!

I have been extremely lazy when it comes to cooking these past few months, but I have been wanting to try this focaccia recepy for a really long time! Today that I had they day off I finally got to make it and after a lot of research online I found a good recepy that wasn't too complicated! ( click here )
When I was in Barcelona I tried this brie focaccia once and I must say that I fell in love right away!

Here is the recepy in English:
  • 3½ dl water
  • 25 gr fresh yeast
  • 2 teaspoons salt
  • 1 tablespoon honey
  • ½ dl olive oil
  • about 7 dl flour

  • basil
  • coarse sea salt
  • 200 gr brie cheese
  • rucola
  • olive oil
 
1. Melt the yeast in the heated water ( 37 ° C  temperature or better said body temperature heh)
2. Add the honey, oil and salt
3. Gradually add the flour and stir
4. Keep adding flour till the dough isn't too sticky anymore 
5. Cover it with a kitchen towel and place it in a warm spot to rise for 30-45 minutes

Dump your risen dough into the pan punching it down to deflate it. Let it rise under a kitchen towel for another 30 minutes.
Leave it in the oven for 10-15 minutes on 250 degrees
Bake until it's golden brown and oil it again ( yeah, you are going to need lot's of olive oil)
 Cut the brie in slices and put the focaccia again in the oven for about three minutes so that the brie melts a bit.
Add some fresh rucola on top and you are done!!
 
It actually turned out better than I thought! It was nice and soft and the basil worked well with the brie. I am definitely going to make this again but next time add some feta and tomatoes!
Yum!
 
Karoliina

Saturday, May 25, 2013

Pink strawberry cake

Hello there!

It was about time to bake a cake again! My mom had her birthday yesterday ( happy birthday once again to my lovely mom!) so a pink cake it is! The decoration is quite similar to the one I made a while ago (click here ).


Now comes the fascinating part of how to make this pink cake!
For the base I used this recipe (tried many but this one has been the best so far!): http://www.kinuskikissa.fi/sienikakkupohja?hakusivu=1

Base:


3 ½  dl flour
2 teaspoons of baking powder
5 eggs
2 ½   dl sugar
1 1/4   dl boiling water

  • Mix the dry ingredients ( flour and baking powder)
  • In a big bowl foam the sugar with the eggs
  • In small (15-20) batches add the boiling water into the foam
  • Sieve the flour into the mixture
  • Pour the mixture into the baking tin and leave it in the over for 30 min on 200 degrees.
  • Let it cool down for 5 minutes before turning the cake upside down
  • Cut in three slices

Filling:

100gr cream cheese
250ml whipping cream
1 dl powdered sugar
750 gr strawberries

Whip the cream and add the cream cheese. Keep mixing it till it gets even and add the powdered sugar.

Now comes the "fun part" of putting the cake together!
 Start by adding one layer of cake and wetting it with milk. I use a lot of milk because I hate it when a cake isn't moist enough. I used about 4-5 dl of milk but it depends on the size of the cake as well...you might need more if the cake is bigger.
Add the sliced strawberries on top
Apply a thin layer of the cream cheese mixture
Keep doing the same thing by putting another layer of cake, strawberries and cream. Remember to wet the cake with milk! Important rule so your cake doesn't end up being all dry and shitty (hupsy!)
Leave your cake for a few hours in the fridge before decorating. ( I left it overnight and decorated it the next day) 
 
For the decoration I used a marshmallow fondant.
 
120gr marshmallows
5-8 dl powdered sugar
2 spoons of water
red food coloring
 
1. Sieve about 4 dl of powdered suger in a bowl
2. In another bowl add the marshmallows and the water
3. Melt the marshmallows in the microwave by mixing them every 30 seconds for two minutes.
4. Add the food coloring ( a drop or two should be enough)
5. Add the melted marshmallows into the bowl with the icing sugar and stir it.
6. Knead the fondant mixture like a bread dough
7. Continue to knead the fondant until it smoothes out and loses its stickiness. Add more sugar if necessary, but stop adding sugar once it is smooth
 
Add a bit of powdered sugar on the surface before rolling out the fondant
Carefully apply the fondant over the cake and cut the edges
 I used about 400 ml of whipped cream which I colored with red food coloring to do the cream piping.
Also around the cake I put a thin layer of cream which I smoothed out with a spatula
 
A wavy cream piping technique.
Not so complicated as it might look.
Add some nonpareil pearls and marzipan roses ín the centre and your cake is ready! ;)
 
 
Karoliina

Tuesday, March 26, 2013

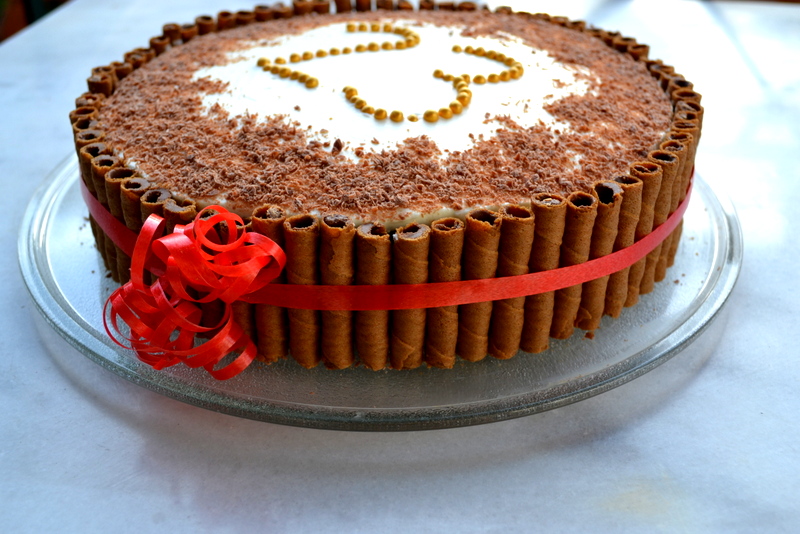
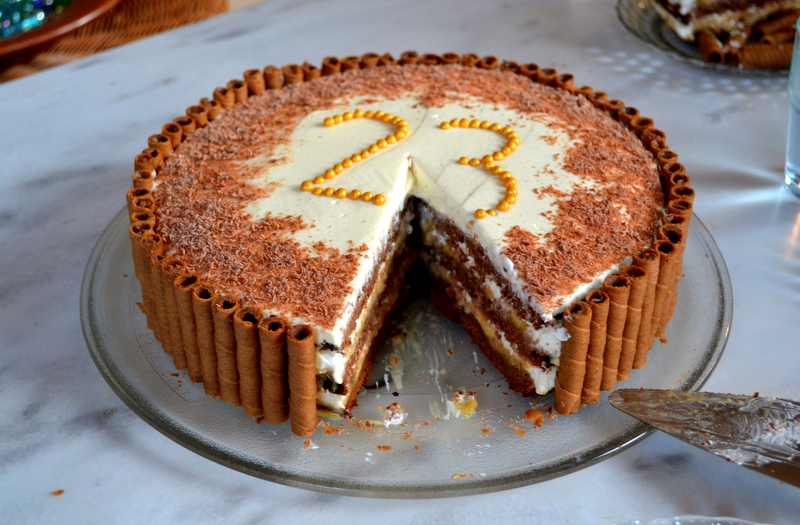
Banoffee cake

Hello there!
 
Cake is the theme of today's post! One of my best friends had her birthday a few days ago so I didn't miss the chance to bake a cake for her :)
 
I put my imagination work and decided to make a banoffee cake. The combination of banana and toffee is just soo goood! Yummy!
 
 
For the base I used the same recipe as here!
 
For the filling you are going to need:
  • 2-3 bananas
  • 1 can of sweetened condensed milk
  • 3-4 dl milk
  •  2 dl whipped cream
For the decoration:
  •  2dl whipped cream
  • milk chocolate
  • nonpareil pearls
  • chocolate wafer sticks
 
Basically there are different ways to make the toffee or dulce de leche. Here is a link if you have never made it before : http://www.wikihow.com/Make-Dulce-De-Leche
What I do is to put the can in a pot and leave it there for three hours in medium-high heat. Usually I make two at the same time because you can save the other can for another desert.
  1.  Cut the cake in three slices and wet the first slice with milk
  2. Spread half of the toffee on one of the cakes
  3. Put on top the sliced banana
  4. Apply a thin layer of whipped cream
Then you do the same process by putting another layer of cake (don't forget to wet it with milk!), toffee, banana and cream. To be honest I would leave the cream out because it became too heavy for my taste...but you do as you like ;)
Leave the cake in the fridge for an hour before decorating.

  • Whip the cream and apply it on top of the cake
  • With a knife make the number on the cream and add the nonpareil pearls in a row
  • Spread the grated chocolate around the number
  • Apply the wafer sticks around the cake
Voila! :)
Happy birthday honey!! :)
 
Karoliina

Friday, January 25, 2013

Birthday cake

Hola amigos!

Yesterday I decided to wake up early ( and people who know me know that I don't tend to wake up early...unless I have to) and make a birthday cake for my father! :)
In a way it was my gift for him as I didn't know what to give him.


Here is the recipe for those who like to bake! :) This is as simple as it gets...baking a cake isn't a piece of cake after all -_- I tried to explain it step by step...hopefully you get something out of it!

For the base of the cake you are going to need:

2 dl flour
1½ dl corn starch
1½ dl coco powder
3 teaspoons baking powder
1 teaspoon salt
2 teaspoons vanilla sugar
150 g butter
3 dl sugar
3 eggs
3 dl milk

1. Grease the baking tin with butter and apply a thin layer of bread crumbs.
2. Mix the butter and the sugar and add the eggs one at a time.
3. Combine the dry ingredients.
4. Add the flour mixture and the milk at the egg-butter mixture in small batches.
5. Put the mixture in the baking tin and leave it in the oven for 50-60 min on 175 degrees.

While you are waiting for the cake to get ready you can start making the fillings! I made two different fillings, but if you want to make only one just double the ingredients of the one you prefer.
When you take the base out of the oven leave it for 15 min to cool down and then turn it over. Cut it in three slices.
 1. Start by putting one layer of cake. Wet it with milk so that it gets moist. (It has to be moist enough otherwise it will be dry and not so tasty) I can't say exactly the amount of milk you will need...probably about 3 dl.
2. Apply the chocolate filling.
3. Put another slice of cake on top and wet it again with milk.
 Keep doing the same thing by applying the cappuccino filling and the last cake layer by wetting it with milk again. Leave it in the fridge for a few hours.
 For the decoration you are going to need :
130 g milk chocolate
3/4 dl cream

Melt the chocolate in the microwave. Heat the cream so that is a bit hot and add the melted chocolate until the mixture is even. Apply it on the cake.

( You don't need to do this, but I thought it would look a bit nicer! )
Melt some white chocolate and do white stripes. Take a toothpick and pull the lines towards one direction.
Clean the edges and leave it in the fridge for 15-20 min.
 Whip 3 dl cream and apply it around the cake with a spatula. Make this flourishing design (hehe I don't how to say it in english...sorry!) on the edges and add some marzipan roses for decoration ( I bought them ready from the store).
You can also add some nonpareil pearls
 
It was fun to make this cake!
Hope this was helpful and if you have any questions don't hesitate to ask! :) 
 
Karoliina

Sunday, December 9, 2012

Karoliina's Cheese Cake

¡Hola!

Unfortunately I don't have any pictures from Greece yet, but I will post photos of our Christmas decoration soon. Me and my mom have been working really hard to decorate the place and make it look a bit more Christmasy!

I don't have many interesting things to say about my life here. I must say that I am trying to recover from being so busy all the time and now I am just relaxing and taking looong naps...no too bad, but I can't keep doing this for too long. At some point I will have to find a hobby or something hehe.

Now that I have more free time my mom asked me to make a cheesecake for the Finnish celebration we had a few days ago so here comes the recipe! This one is more simple than the Manhattan's cheesecake I promise!

For the base I used two kinds of biscuits. I usually use only digestives, but this time I wanted to try something different and I mixed them with cinnamon flavoured ones.
 
 
The base:
 
Mix the melted butter ( I usually do it in the microwave...fast and simple ) and the biscuit crumbs. Apply the mixture on a baking tin.
 
Filling:
 
Put the gelatin leaves in cold water to get soft. Wheep the cream and add the sugar in it. Strain the water from the gelatin leaves when they are ready. Boil some water ( I needed about 3-4 spoons ) to melt the gelatin leaves and add them to the cream cheese. Mix the whipped cream with the cream cheese and apply the mixture on top of the base. Leave the cake in the fridge for a few hours before making the last layer.
 
Top layer:
 
For the top layer I used different kinds of berries, but you can use the ones you prefer the most.
Put again the gelatin leaves in cold water to get soft. Take 1dl of the berries and heat it up in a sauce pan. Add the sugar and melt the gelatin leaves. Leave it to cool down a little bit before mixing it with the rest of the berries. Apply it on top of your cake and leave it in the fridge for a few hours again before serving.
 
 
Voilá! 
Hope you like it! :)
 
 
Karoliina

Thursday, September 20, 2012

Toffee cup cakes

Hey there!

Yesterday I promised to put the recipe of the cup cakes so here it goes!
I made the icing the previous day because it needed to be in the fridge overnight.

12 small cup cakes
For the icing:
  • 2dl brown sugar
  • 2dl cream
Measure the ingredients in a saucepan and heat the mixture until it starts to boil. Leave it to cool down and put it in the fridge overnight.

For the dough:
  • 2 eggs
  • 2 teaspoons of baking powder
  • 3 dl flour
  • 50 gr melted butter
  • 1 dl sugar
  • 1 dl milk
Foam the eggs and the sugar. Combine the dry ingredients ( flour and baking powder ) and melt the butter. Add the milk and the melted butter in the egg-sugar foam. In the end sieve the flour into the mixture. 
Put the cup cakes in the oven for about 15 minutes on 200 degrees. Leave them to cool down.


Take the icing from the fridge and whip it till it has this creamy texture.

When the cup cakes have cooled down apply the icing on top and voilà! For the decoration you can use nonpareils :)
 
 
I would have added some peanuts to the dough to balance the taste a bit...oh well, next time! :)
 
Karoliina

Thursday, September 13, 2012

Chicken pie

Hey there!

I have never liked eating salty pies (if we don't count feta pies), but I once ate this chicken pie that was really good so I had to try and  make my own version of it.
I recommend you buy a ready-made base for it, but if you can't find one I basically used the same base I used for the apple pie I made a while ago but with less sugar.

Here is what you are going to need:
for the base
  • 2 dl flour
  • 80 gr margarine
  • 1 teaspoon sugar
  • ½ dl cold water
for the filling
  • 300 gr chicken
  • 150 gr grated cheese
  • 3 peppers ( I used one green, one red and one yellow)
  • 200 gr cream cheese
  • salt and pepper
 Click here to see how to make the base
For the filling fry the chicken and season with salt and pepper. Cut the peppers in small pieces. Mix all the rest of the ingredients together and apply the mixture on the base. Leave it in the oven for 30 minutes on 200 degrees. Voilà!
 
Karoliina